Provider Tutorial
Make the most of the Find a Sail platform.
Workflow tutorial video
Table of Contents
Joining Find a Sail
Welcome to the Find a Sail Crew!
We are thrilled to have you onboard and look forward to building a trust-based, win-win relationship.
As a provider, your journey with us starts a bit differently than our regular users. We want to ensure that the onboarding process is tailored to your needs, and that we get to know you a little bit along the way.
First Steps:
Step 1: Get in Touch
The first step is to simply reach out to us using our contact form and schedule a quick online meeting. You can also book a meeting directly on our contact page.
Tip: Read more about joining on our Partners & Providers page.
Step 2: Schedule a Meeting
During the meeting, we’ll discuss how Find a Sail can best support your needs, answer any questions you may have, create your profile, walk you through how the platform works, and sign an agreement.
Step 3: Receive Your Log-in Details
After this, we’ll send you your log-in details, and you are good to slip the lines!
Tip: We recommend adding @findasail.com to your email’s safe sender list to ensure you don’t miss any important bookings and communications!
Setting up your profile
Step 1: Log in to your account: use the login details we sent you. You can change your password anytime from your profile.

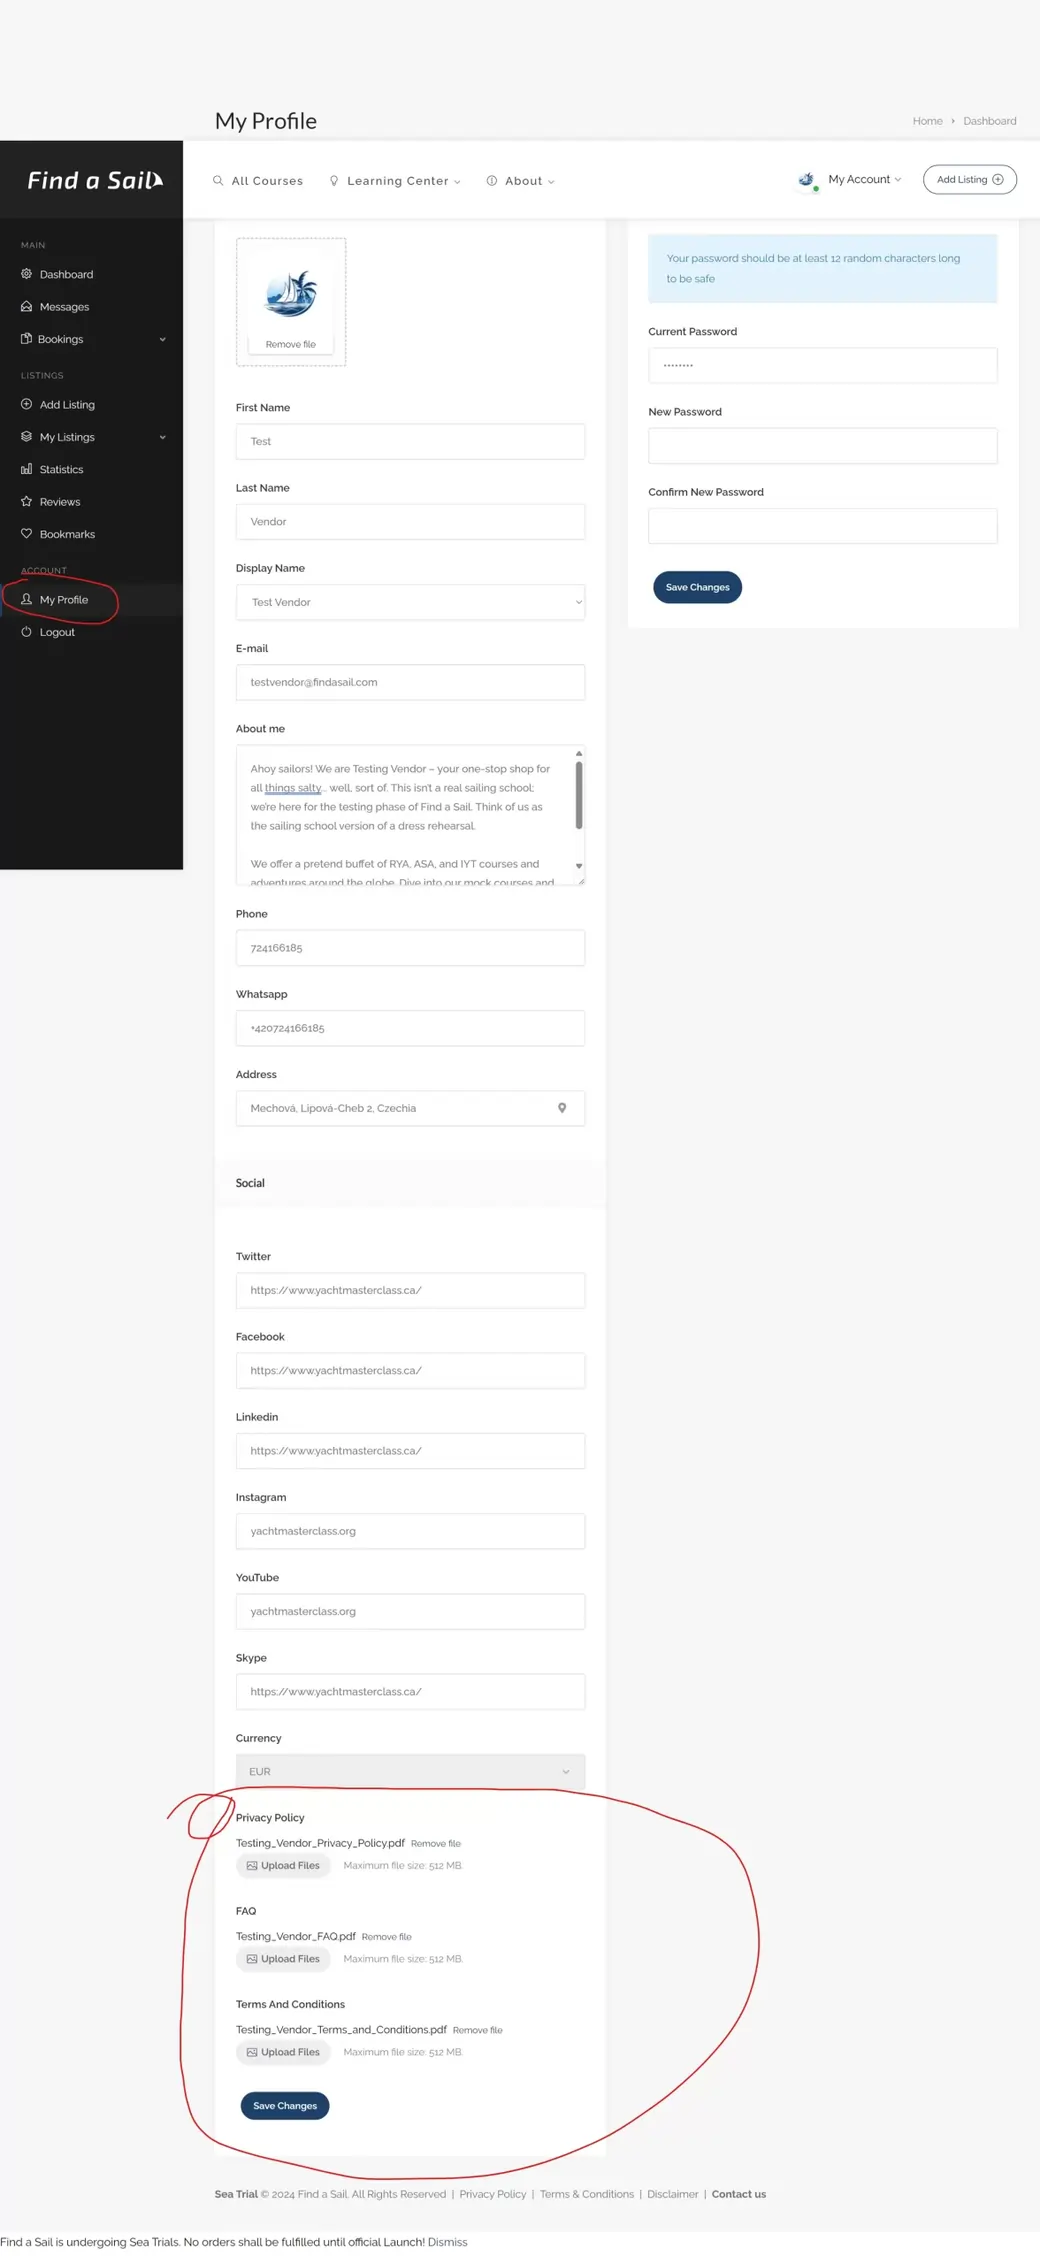
Step 2: Navigate to ‘My Profile’ in the dashboard.
Step 3: Fill in your profile details, including your bio, contact information, upload a school Logo (profile picture), and, importantly upload your T&Cs (including booking conditions), FAQs, and Privacy Policy. These should be in PDF. Please refer to our Guidelines. (TBD)
Dashboard
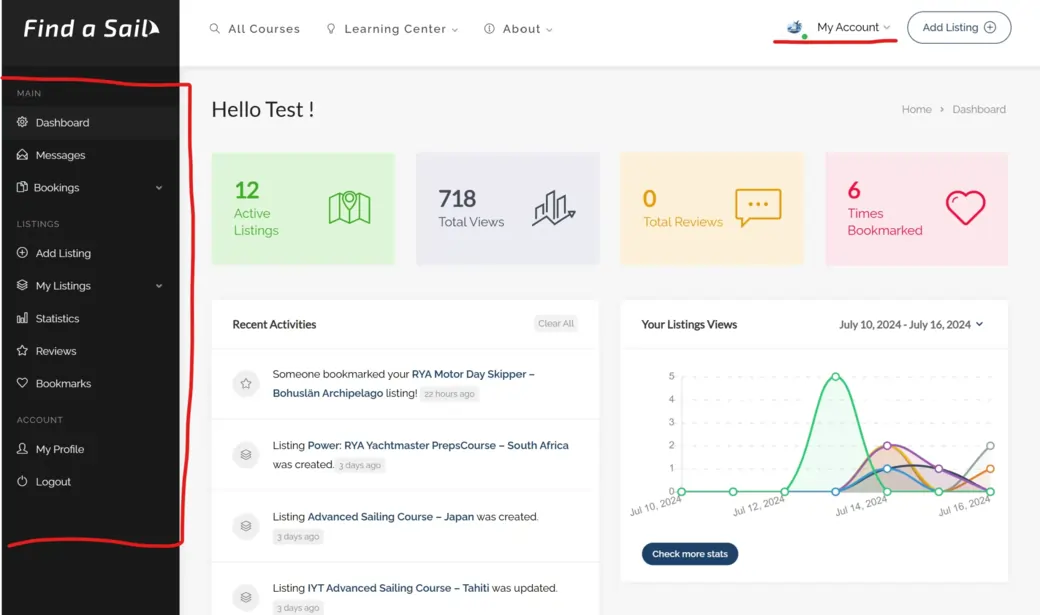
Dashboard is your central hub where you can manage everything related to your Find a Sail profile, bookings, communications, listings, statistics, and reviews. The dashboard overview gives you a quick sumup of your listings, trends, and statistics.
Creating and Managing Listings
My Listings
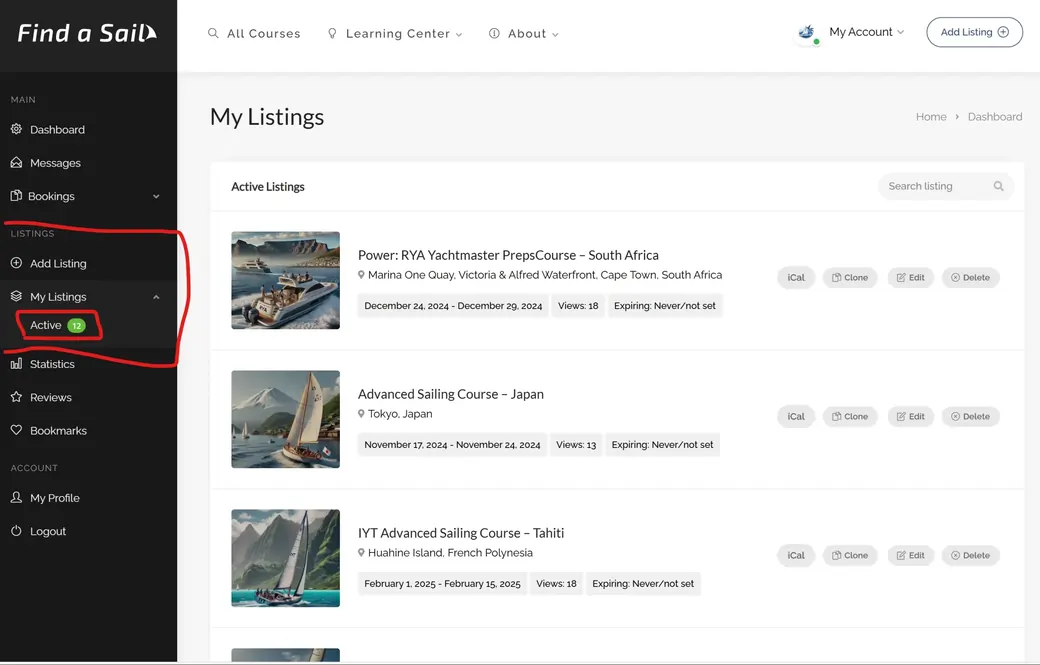
In the “My Listings” section, you can view, edit, and manage your active listings. You can also use the Cloning feature to duplicate a listing with new dates, which is handy if you run the same course every week!
Adding a New Listing
Step-by-Step Guide:
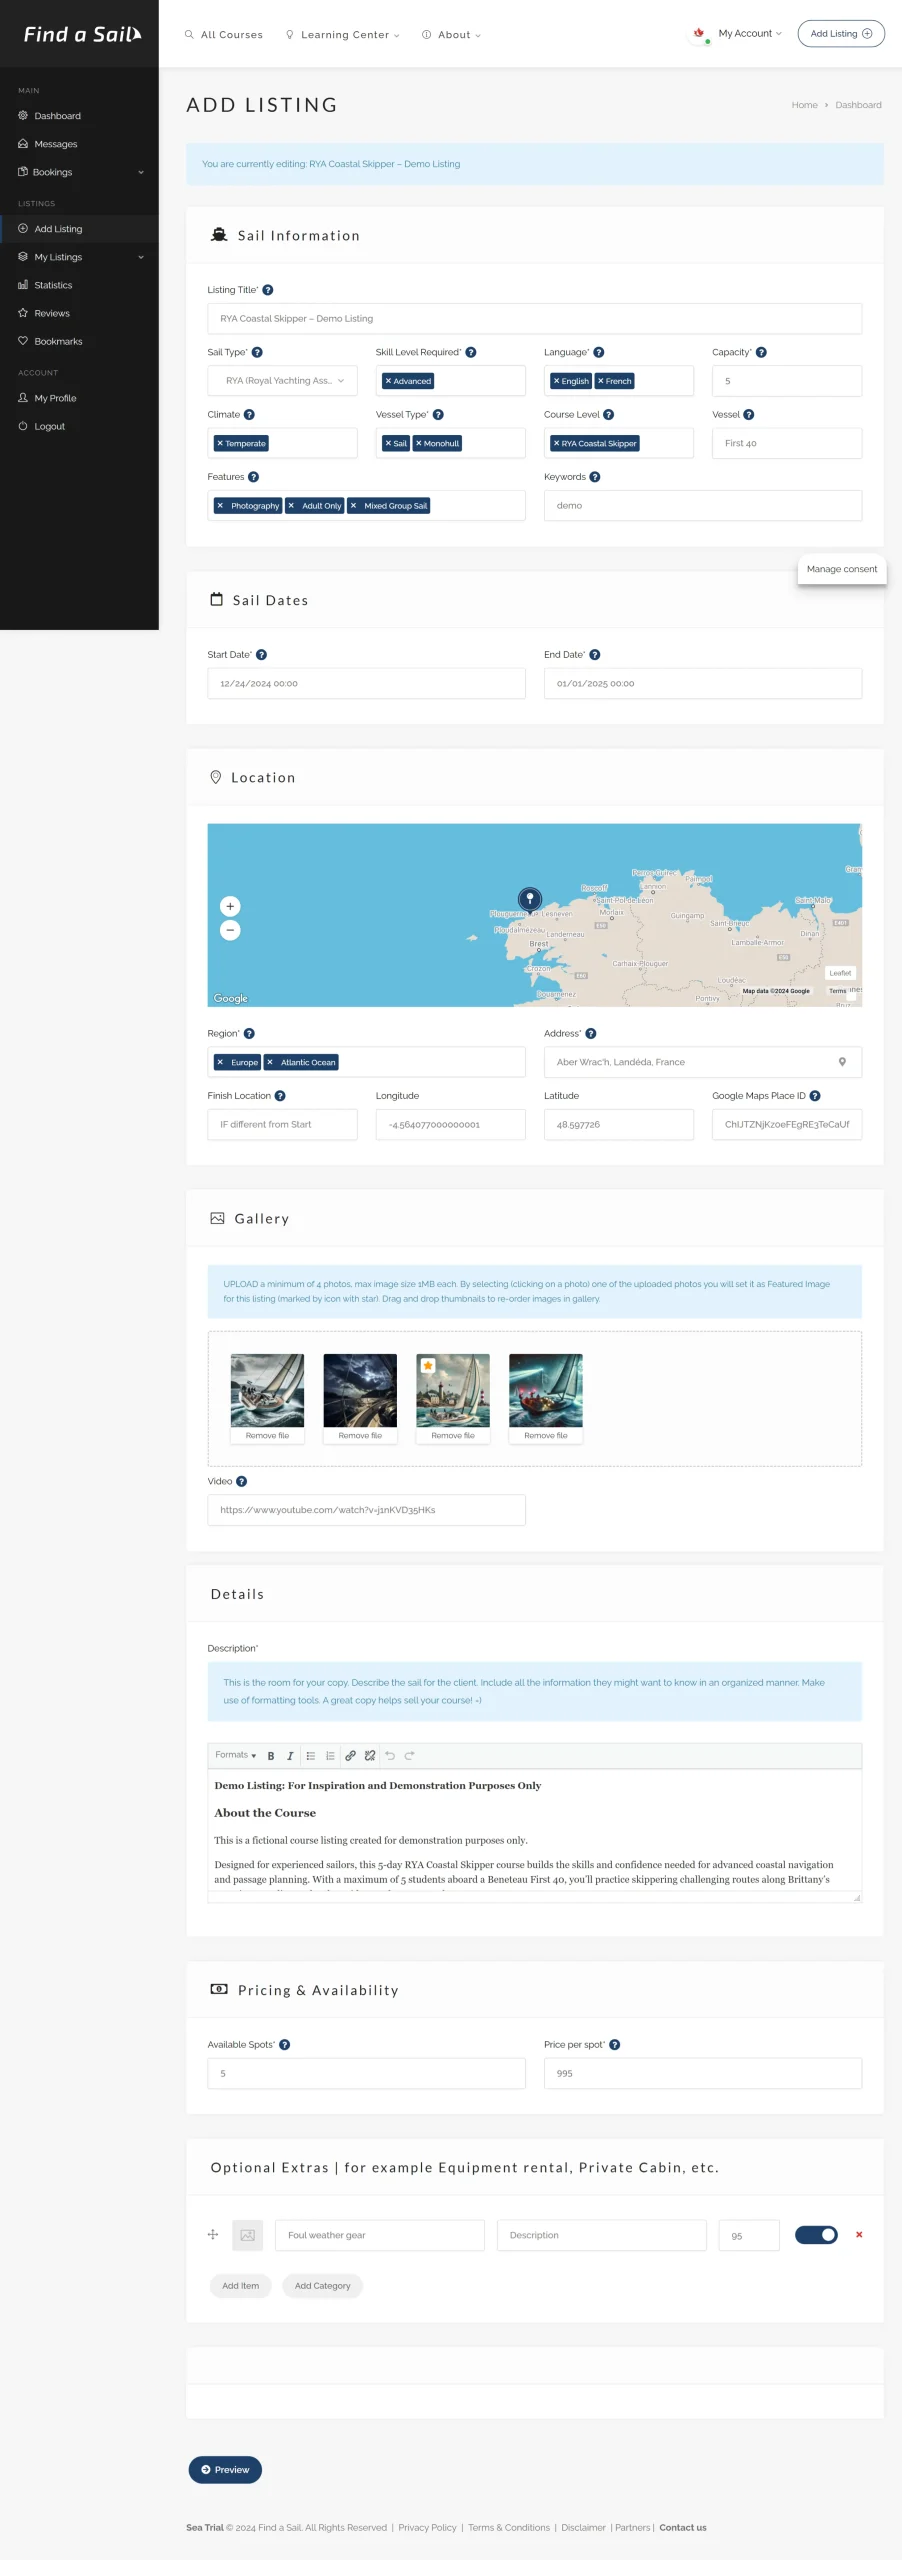
Step 1: Click ‘Add Listing’
- You can find the ‘Add Listing’ button in the Dashboard or at the top right corner of the page.
Step 2: Fill in the Required Details
- Enter details such as title, description, location, and availability. Tooltips are available if you are unsure about any fields.
- Tip: Ensure the Description contains all the necessary information the customer might seek. This will reduce back-and-forth messages and administrative work for you, and help sell the sail more effectively!
- Use Headings and Paragraphs to add style to your Description.
Step 3: Pay Special Attention to the “Address” Field
- If you enter your business address, we will automatically populate the place ID* and display your Google reviews directly on the listing. The latitude and longitude will also be filled in automatically.
*please note: the Google place ID is now paired with your school automatically in your “Profile” and no longer present on the Listing form.
Step 4: Upload Images
- Upload images that best promote the sail. Please try to keep the images under 1MB each. We recommend using free and fast online compression tools like TinyPNG.com.
Step 5: Preview and Publish
- Click ‘Preview’ to see how your listing will appear.
- Once satisfied, click ‘Publish’ to make your listing live!
Split-Date Courses
If your course runs on non-consecutive days (e.g., a weekend + an additional day the following week), you can now specify this directly in your listing.
1. Enter the Full Course Duration
- In the Add Listing Form, set the Start Date as the first class date and the End Date as the final class date.
- Even if there are breaks in between, the End Date should be the last session.
✅ Example: If your course runs on March 1-2 + March 8, enter:
- Start Date: March 1
- End Date: March 8
2. Specify Non-Consecutive Days
- Below the date fields, you’ll see a field labeled “Non-Consecutive Days (If Applicable).”
- Explain the session dates in a way that best suits cloning and clarity.
✅ Example Entries:
- March 1, 2 & 8 (Not clone-friendly—needs manual updating when duplicating the listing.)
- “Runs on Saturday, Sunday, and the following Saturday.” (Clone-friendly—can remain unchanged if copied.)

3. Clarify in the Course Description
- Provide a clear schedule breakdown in the description to avoid confusion.
✅ Example Description:
“This course runs over two weekends. There is a break during the weekdays.”
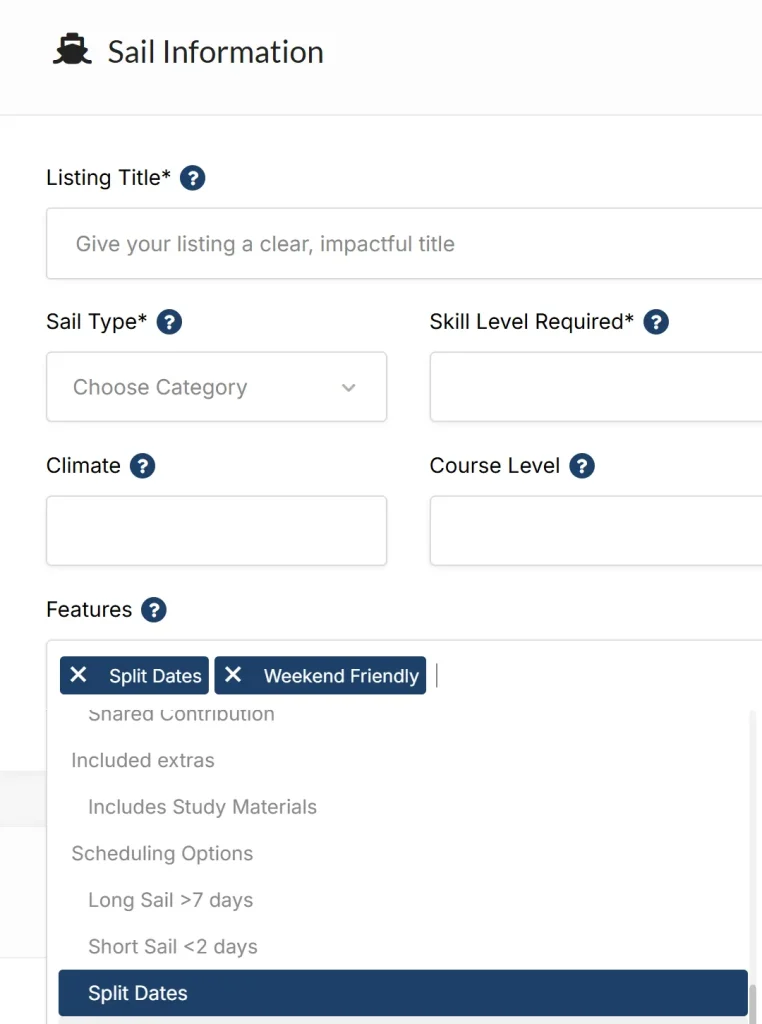
4. Selecting Scheduling Options (Features)
To help students find the right course, you can now tag your listing with Scheduling Features:
- Scroll to the Features section in the listing form.
- Select any applicable options, such as:
- ✅ Split Dates – For courses that run on non-consecutive days.
- ✅ Weekend Friendly – For courses that don’t require taking time off work.
- ✅ Short & Long Sails
- These features will be displayed on your listing and help students filter courses that match their availability.
Cloning a listing (Updated for 2026)
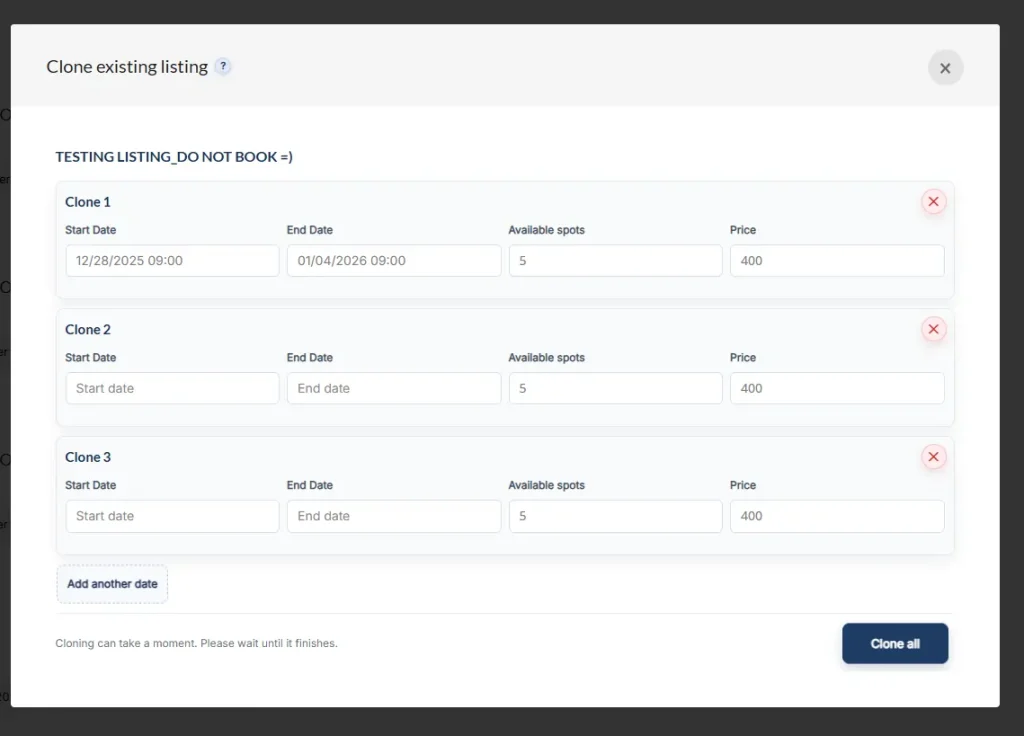
If you run the same course regularly, you can save time by duplicating it (CLONING) with new dates. This will create an exact clone of the listing in the dates you specify.
In “My Listings” dashboard, click clone > select new dates.
Update 2026: You can now add multiple dates and Clone them all at the same time. By default, we will prefill the start time according to the original listing, and End date according to it’s original duration. You can also assign separate availability and price to each clone should they differ from the original. Note: If you cannot see the new cloning dialog, try hard refreshing the page in your browser (CTRL + F5).
Cloning a listing creates a new copy which includes all the media. It might therefore take a while for the cloning to finish. Please do not close the page before receiving confirmation of the process completion.

Managing Course Availability
Keeping track of course inventory (spots available for sale) prevents overbooking. Additionally, you can Deactivate a listing if you no longer want it publicly displayed but may need it later.
Available Spots (Backend-Only Information)
- This is the total number of spots you are offering for sale through the platform when you input a listing.
- Only visible to you in the backend; clients do not see this.

Spots Counter in the Listings Dashboard
- Shows how many spots are still available out of the original Available Spots count.
- Example: 5/8 → 3 spots have been sold, and 5 spots remain open.
- You can manually adjust (+/-) the available spots if you sell through other channels, helping prevent overbooking.

Activating & Deactivating Listings
If you no longer want to display a listing publicly but don’t want to delete it outright, you can Deactivate it.
- Deactivated listings move to the Expired folder.
- You can reactivate or clone them anytime if needed.
- This keeps your listings organized without losing any details.
Keeping these updated ensures a smooth booking experience and better control over your listings. 🚀
🛈 Note: The Capacity (Crew Capacity) field in the listing entry is customer-facing and indicates the maximum number of customers that could be onboard. It is separate from the Available Spots field, which manages actual availability for booking.
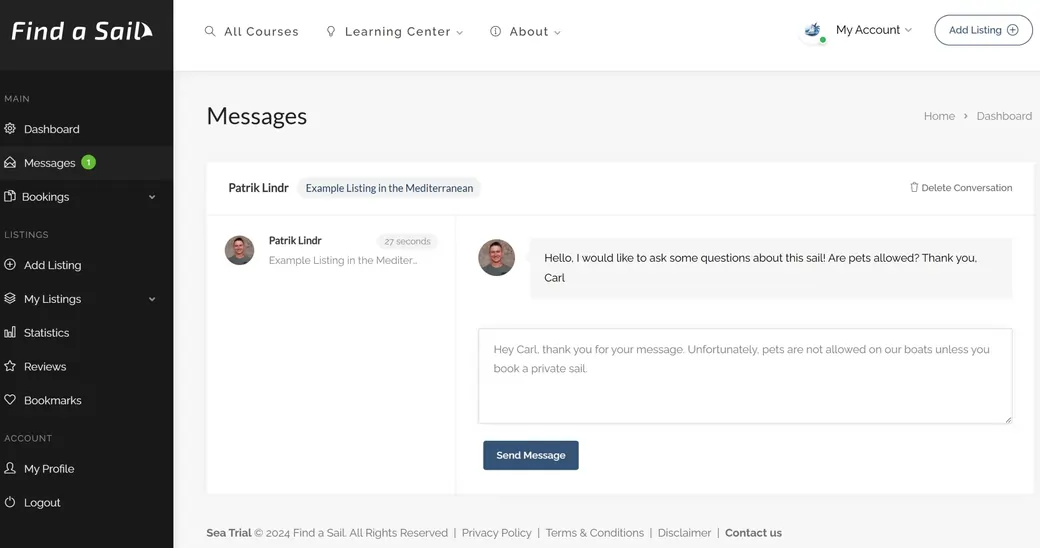
Communication with Clients
When a customer sends you a message through the platform, you will receive an automatic notification to your email.
Step 1: Go to ‘Messages’
- Navigate to the ‘Messages’ section in the dashboard.
Step 2: Select the Conversation
- Select the conversation with the client and communicate in a conversation-style messaging environment.
Note: To facilitate smooth communication, we have not imposed any hard limits on the information you share. However, we kindly ask you not to use this goodwill to circumvent the commission system upon which the platform relies. Thank you for your understanding!
Booking Process
Overview
This section will guide you through the booking process from the provider’s perspective. Learn how to manage booking requests, communicate with clients, and finalize bookings seamlessly.

Step-by-Step Guide:
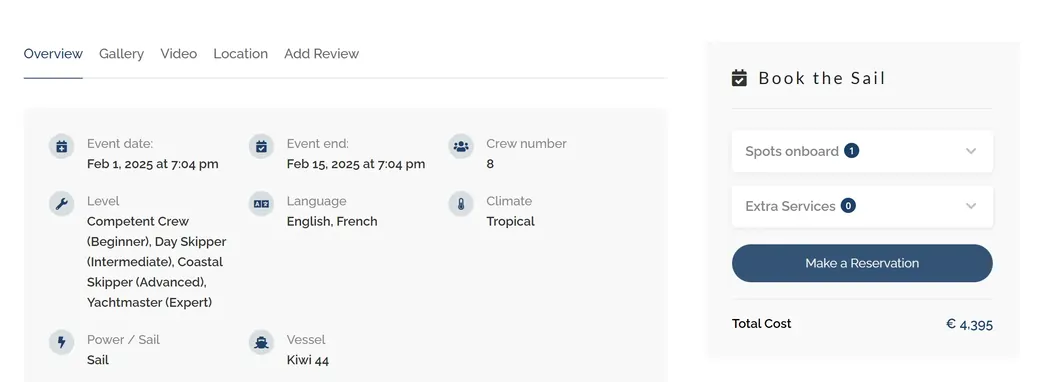
Step 1: Clients Browse Your Listings and Send Booking Requests
- Client Action: Clients browse your listings and click “Make a Reservation” to send a booking request.
- Notification: You will receive an automatic email notification and a dashboard alert when a client sends a booking request.
Step 2: Review and Respond to the Request
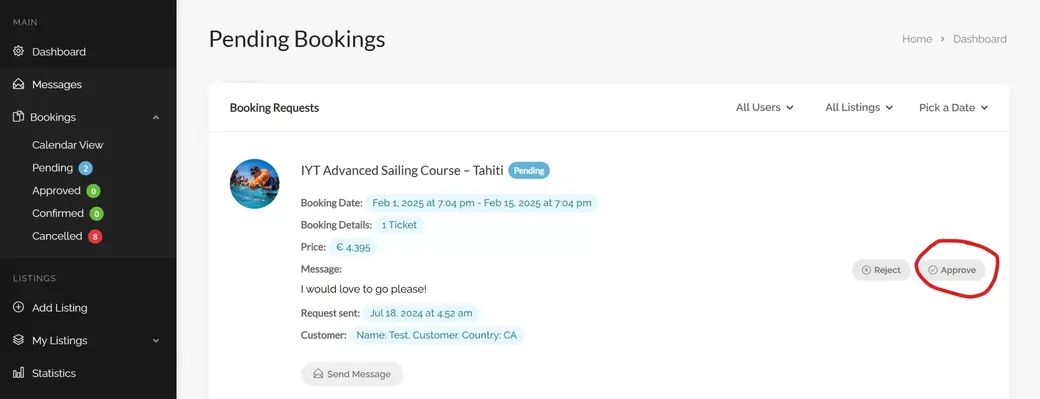
- Action Required: Go to the ‘Bookings’ section in your dashboard.
- Review: Check the details of the booking request, including dates, number of guests, and any additional information provided by the client.
- Decision: Review the request and either accept or decline it.
- Approve: If the request fits your schedule and availability, click ‘Approve’. This commits you to sell this spot to the customer upon their Final Confirmation.
- Reject: If you are unable to accommodate the request, click ‘Reject’ and optionally provide a reason in a direct message to the user.
- You can now start communicating with the client through direct messaging.
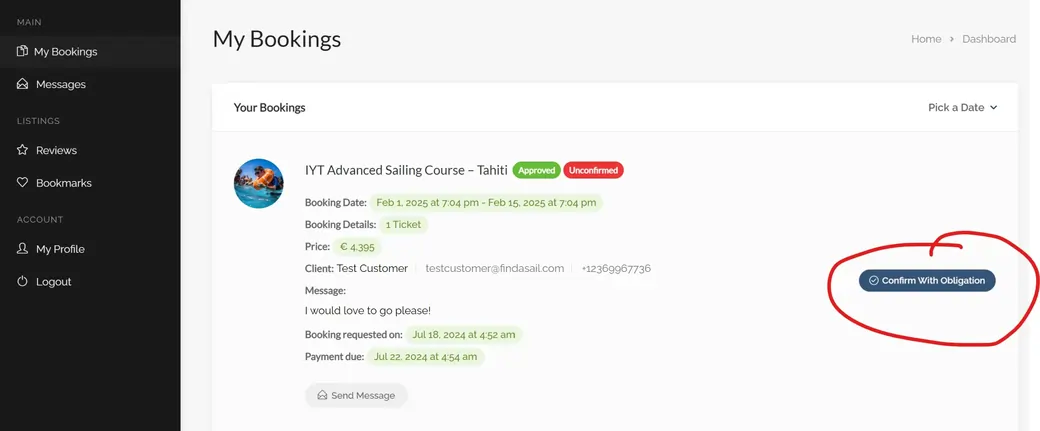
Step 3: Customer Makes Final Confirmation with an Obligation to Pay
- Customer Action: The customer receives a notification that their request was approved and makes a Final Confirmation, which includes an obligation to pay. They need to confirm within 24h otherwise their request will expire.
- Connection: Upon the Final Confirmation, we will connect you directly with the customer via your registered email, and you will receive their details to finalize the booking.
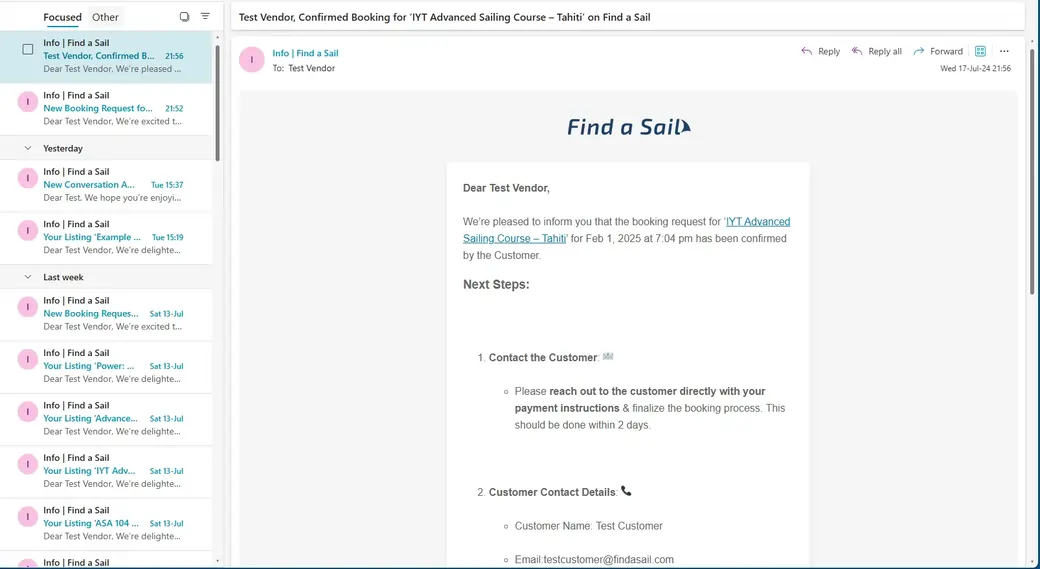
Step 4: Finalize the Booking
- Connection: You will receive an email with the customer’s contact details.
- Payment: Please communicate with the client directly, send them an invoice, and finalize the booking using your regular payment process. (Tip: Make sure you describe the payment methods available, deposit & balance policy, refund, and cancellation policy in your T&Cs uploaded to Find a Sail through your profile.)
- Note: Clients will sort out the payment directly with you.
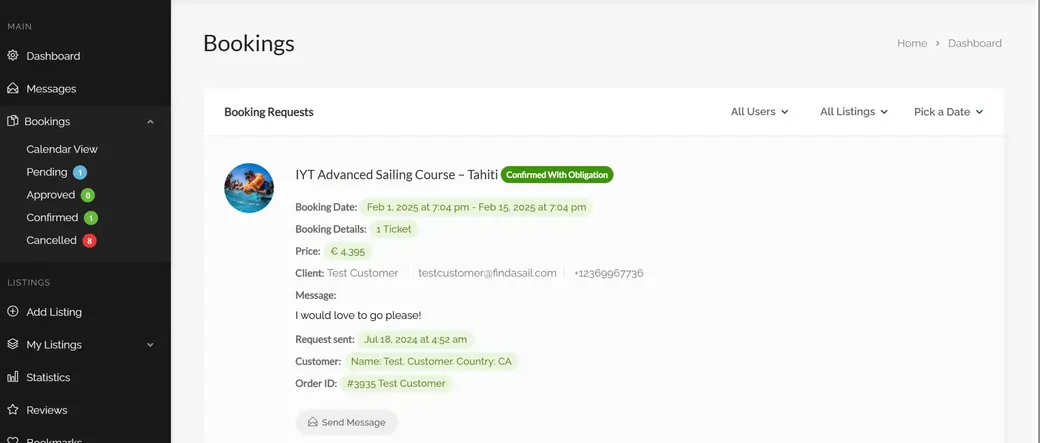
Important Notes:
- Updates: Throughout the process, you and the client will be kept updated via email and dashboard notifications. Remind clients to check their spam folder if they are unsure about receiving notifications.
- Commission: The commission is presumed due upon the introduction of a confirmed booking, as outlined in our Terms & Conditions, unless the client fails to communicate with you and pay.
Additional help
If you have any other questions, please don’t hesitate to reach out to providers@findasail.com or use the contact form. Thank you for being a part of Find a Sail crew!
